How I Paint Dark Angels
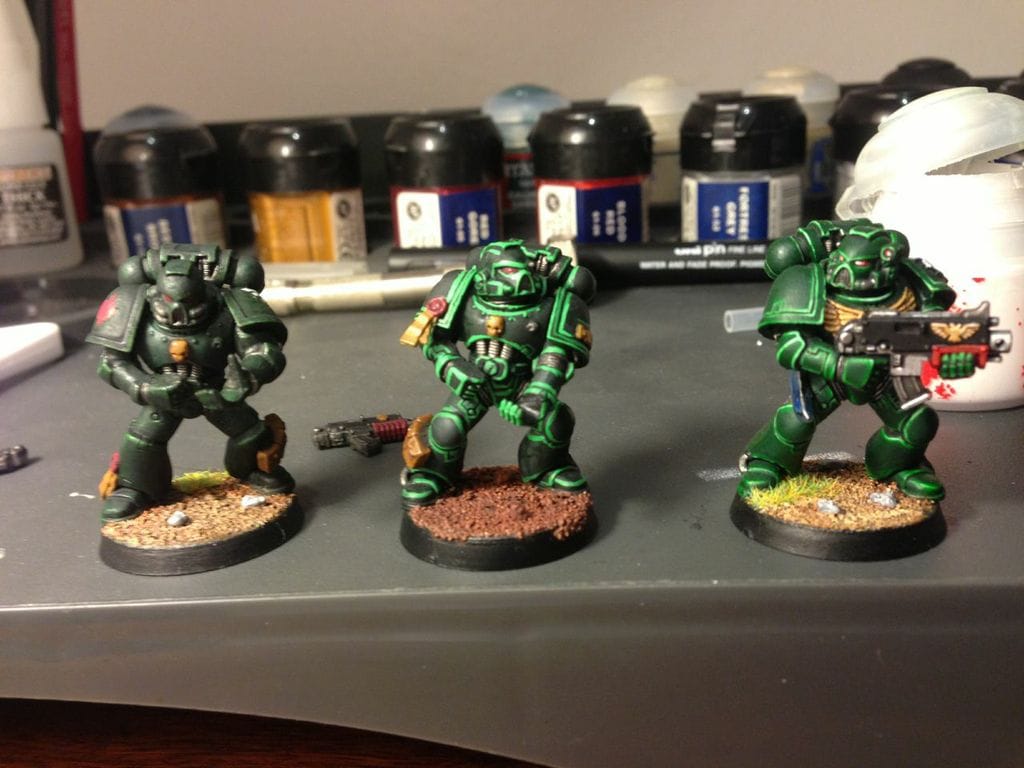
So here is a progression picture and guide to how I paint my Dark Angels marines. Takes me between 4 and 7 hours depending on the day and the model to get a single marine done. I tend to do step one in bulk as a squad and individual models from step 2 onwards
Step 1 - Model on the left
- Black undercoat
- Caliban green armor base coat
- Snakebite leather base for purity seals, skulls, chest plates and pouches
- Leadbleacher/Boltgun Metal base for metal parts
- Red gore base for wax of purity seals, lenses, gun grips/anything you want red
- Nuln Oil is applied over the metal and green areas and very lightly over the lenses
- Agrax Earthshade wash is applied over the brown/leather areas and red areas except lenses.
- Always paint the guns separately… there is no point trying to be a hero and paint a breastplate from crazy angels where its obscured by a gun.
Step 2 - Model in the middle
- 50/50 mix of dark angels green and skull white, then thinned with water is painted on all edges of armor. I do a triple line on the shoulder plates, outside and inside edge of the bezel plus a line just inside the inner edge of the bezel, leaving a small black edge in the crevice where the wash will have darkened the armor
- This is a time consuming process, rotate the model constantly looking for more edges and lines that can be highlighted, at this point coverage is more important than neatness
- Sharper highlights are applied again on the corner or raised edges this time with a lighter 40/60 mix of green to white, and then once again with a 30/70 mix for the final highlights used sparingly
- Use water in the mix to make the paint flow, it is better to have the paint too watered down and have to do an additional coat then to apply the paint too thickly and have it dry while still on the brush.
- If you accidentally cover a crevice or shaded corner with a highlight, simple repaint the Nuln Oil Directly into the area and redo the highlight if necessary
Step 3 - Model on the right
- A 50/50 mix of dark angels green and water is used to repaint the base coat on the model and sharpen and clean up all the highlights, use a steady hand and take your time, 2-3 layers of paint will be required. Gradually bring in the green and make the highlights thinner and sharper, use a small brush!
- The final effect will be extremely smooth, but make sure you wait for each layer to dry before painting the next
- The advantage of the watered down paint is if you slow and go over a highlight or narrow it too much, a single layer wont be particularly noticeable, or can be completely undone by immediately brushing it with a tissue or your finger.
- In certain areas (under the eye lenses is a good example) you may wish to entirely cover the highlight with a single layer, this give a good blending effect where the original highlight is faded but still visible beneath the very thin layer of dark angels green.
- Highlights are completed on other details such as the purity seals, pouches, metal etc…
- I highlight metal with chainmail, bone can be highlighted up to bleached bone or screaming skull and even a bit of white, leather to snakebite leather mixed with bleached bone work up to blood red mixed with a small amount of white for purity seals, and all the way to pure white with lenses.
- The degree of the highlights comes down to taste, but as a general rule, the more layers and more gradual the buildup to the final highlight the better. I like bright highlights personally, you may wish to keep them more subtle. Just use less or no white in your final highlight if that is the case.
- You can also use citadel glazes to further blend highlights, but for the most part I find them unnecessary.
- If you want to get very fancy, try highlighting metal with greys mixed with white to get a non-metalic metal (NMM) effect. I find hybrid NMM where a metalic base is used can be very effective on the very small metal details found on marines.